Student Employment Paycheck Information
Paychecks are mailed to the student’s address as listed on the W-4. To verify this address, log in to SharkLink and click on the blue Self-Service Banner (WebSTAR) tile in the lower left "Quicklinks" section. Click on "Employee," then "Tax Forms," and "W-4 Tax Exemptions/Allowances." To make changes to your HR/Payroll address, submit this request via Self-Service Banner in SharkLink by following the instructions in the Quick Guide to Employee Self-Service: HR/Payroll Address Updates.
Student employees are encouraged to sign up for direct deposit of their paychecks. This is a separate process than the one you may have completed for direct deposit of your financial aid refund. To authorize direct deposit, follow the instructions below. When direct deposit information is created or deleted, an email will be sent to students' NSU email address to alert them that changes were made.
For questions regarding the direct deposit set up, please contact the payroll office at (954) 262-7887.
Student employees who wish to have their paychecks directly deposited into their bank account must authorize direct deposit through the process below which is separate from the direct deposit authorization for refunds. When setting up direct deposit for payroll, you have the option of splitting your payroll payment into multiple accounts.
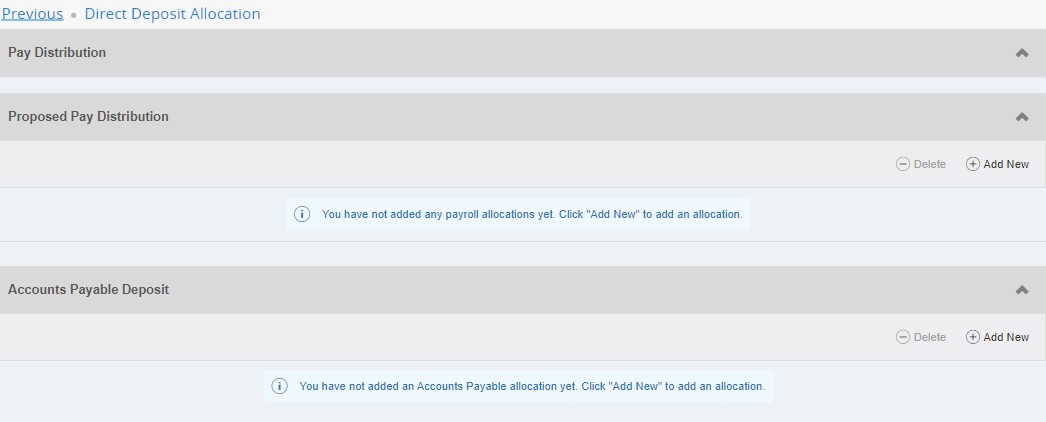
The Direct Deposit Allocation Form lists three sections as follows:
Pay Distribution: If direct deposit is already in place, this section will display the allocation on the most recent payroll.
Proposed Pay Distribution: If direct deposit is already in place, this section will automatically display the current allocation. You can add new, delete, or make changes to an existing allocation in this section.
Accounts Payable Deposit: If Direct Deposit is already in place for student refund payments, this section will automatically populate. You can add new or delete existing allocations in this section. Because only one account is permitted, you will typically not need to make changes but will either delete or add new account information.
A. Add Direct Deposit Account for Payroll Payments
- Select "+Add New" under the Accounts Payable Deposit section.

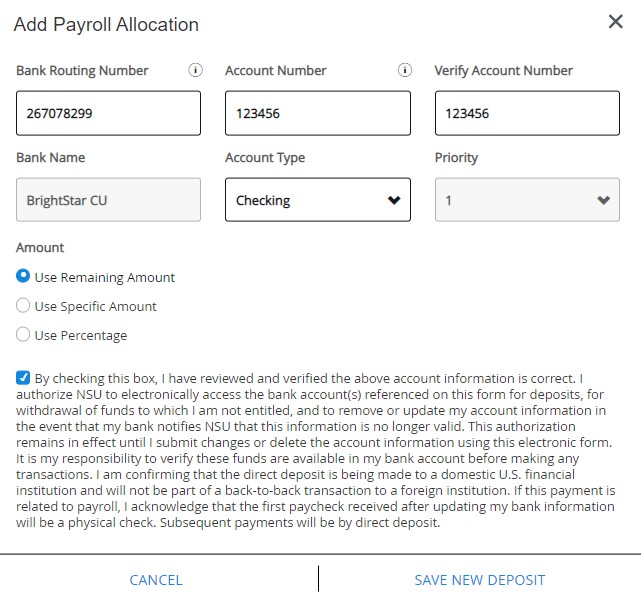
- Enter your routing information, account number, and account type.
-
Priority #1 will default when you set up the first account.
-
Under amount you have three choices. You must select “Use Remaining Amount” for at least one account. See below for important details on the Priority and Remaining Amount functionality.
-
Check the box to attest that you have read and understand all of the statements listed.
-
Save New Deposit.
You may repeat the above steps for up to five different bank accounts. After you have saved your Payroll Direct Deposit set up, you will see your account(s) reflected under the Proposed Pay Distribution box. You will see that the status is “PreNote” for new accounts. The first payment you receive after you set up new payroll direct deposit accounts will be made via a physical check which will be mailed to the HR/Payroll address on file. Verify that this address is correct by reviewing the information in your profile (Click "View my profile" on the home page of your SharkLink). After the first payroll payment is issued via check, the status will be updated to “Active” and future payments will be directly deposited into the referenced accounts.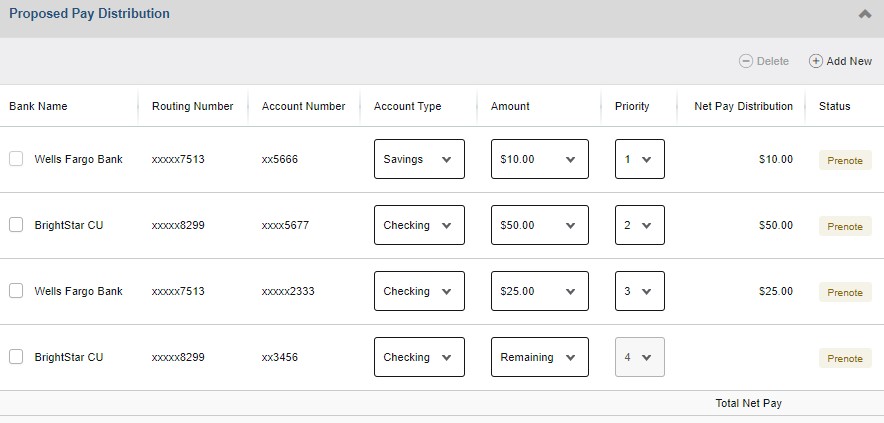
Setting the “Priority” for your Payroll Direct Deposit
The priority will determine how direct deposit will be completed, up to the maximum of your net pay.
When setting up multiple accounts for direct deposit, the account with the highest priority (1 being the highest) will receive payment first. The first time you set up direct deposit, the “remaining amount” will be set at Priority 1. If any subsequent accounts are added, the “remaining” will automatically have the priority changed so that it is the lowest in priority (i.e., the highest number).
A priority of 1 means that this is the first deposit that should be made. If there is pay remaining, then the system will review priority 2 to determine the second deposit. This will continue as long as there is net pay available, with the last account being the account referenced in the “Use Remaining Amount” section.
For example, consider that your direct deposit is set up as follows:
Priority 1: Percentage of 50%
Priority 2: Specific Amount of $400
Priority 3: Specific Amount of $50
Priority 4: Remaining Amount
If you have a net pay of $1,000, then 50%, or $500, will go to Account 1. This leaves $500 remaining, $400 will go to Account 2, $50 will go to Account 3, and the remaining $50 will go to Account 4.
However, in the above example, if you have a net pay of $850, then 50%, or $425, goes to Account 1, leaving $425 remaining. $400 will go to Account 2, and the last $25 will go to Account 3 because that “uses” all of the net pay. $0 will be deposited in Account #4.
Setting the “Amount” for your Payroll Direct Deposit
Option #1: Use Remaining Amount
Every direct deposit must have at least one bank account set up to “Use Remaining Amount.” This is considered to be the “primary” account for your direct deposit. If you will be setting up more than one account for direct deposit, the first one you set up should be the one that will be used as the primary/remaining amount account.
Option #2: Use Specific Amount
Setting up direct deposit to “Use Specific Amount” is optional. Selecting this option allows you to indicate a specific amount that you would like to be deposited to a specific account.
Option #3: Use Percentage
Setting up direct deposit to “Use Percentage” is optional. Selecting this option allows you to indicate a specific percentage of your pay distribution to be deposited to a specific account. This option can be a little misleading because the percentage is based off the total amount remaining. If you have multiple accounts using a percentage, the subsequent accounts will be based off the updated amount remaining.
For example, if you receive $1,000 on your net pay, and you select 25% to go to Account 1, that means $250 will be allocated to Account 1, leaving $750 remaining. If you select 50% to go to Account 2, then 50% of the remaining $750, or $375, will be allocated to Account 2.
Changing the Amount, Percentage, Priority, or Deleting your Payroll Direct Deposit
After you set up your direct deposit, you may want to change priority or update an amount or percentage. This is very simple. In order to do so, select the item you would like to update and make the updates.
All direct deposit set up must have at least one account set up for the remaining amount. If you are changing the priorities of your accounts, make sure that the account that will receive the "Remaining Amount" is set to have the largest number (i.e., the lowest in priority).
After the updates are made, you will need to check the box at the bottom of the window to attest that you have read and understand all of the statements listed. Then you will be able to save your changes.
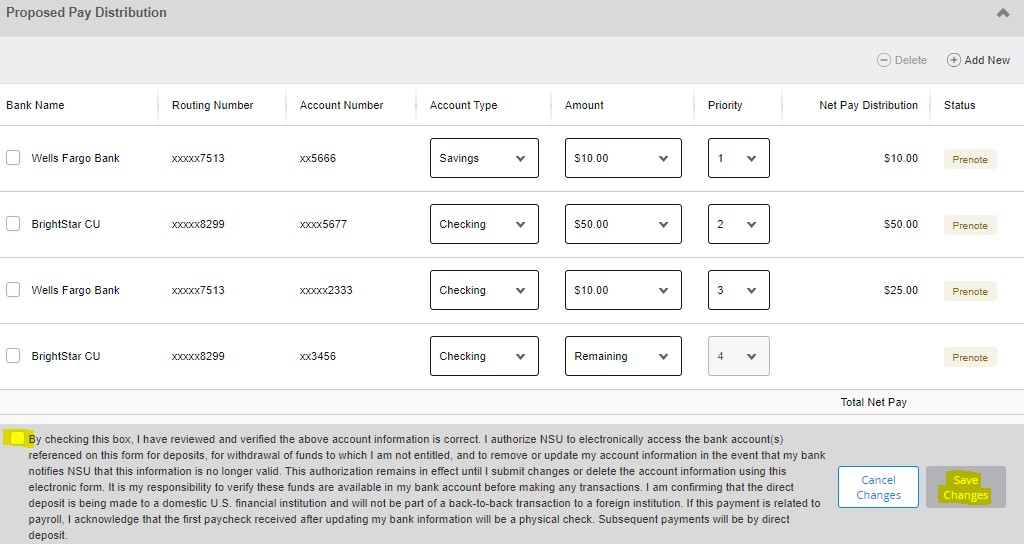
When deleting a payroll related account, remember you must always have a direct deposit set up with Remaining Amount as the lowest priority. If you would like to delete the account that was set up for the remaining amount, then you must first change the priorities so that the account you would like to delete is no longer listed as the remaining amount.
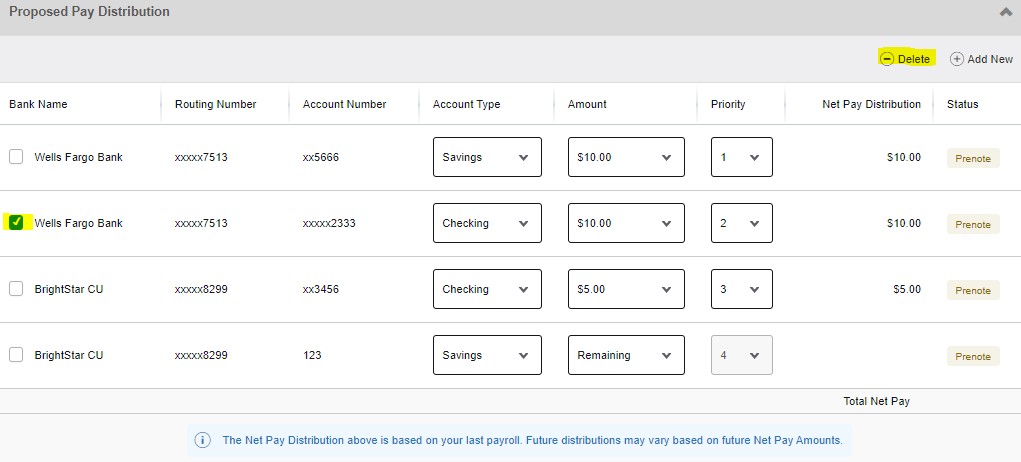
After you select delete, you will receive a pop-up box to confirm that you would like to delete the direct deposit.